Showing posts with label woodworking. Show all posts

Wednesday, August 4, 2010

Updates galore...

A few months ago, I went on a cleaning spree, which resulted in the cleaning out of the closets. I started cleaning up the kitchen shelves and posted that I would display my results. Unfortunately, this shelf is "unorganizable". I did, however, find a solution. So....

Kitchen Shelf before...


and Kitchen Shelf after!


Lowe's had a sale on painter's drop cloths. I got a 6x9 canvas cloth for under $5. I then bought a curtain rod for around $2.25. The canvas happened to be two 4.5 x 6 dropcloths sewn together. I took them apart and created a pocket for the curtain rod to slide into. I then tied the rod to the rack, using cable ties. I still need to attach some fabric tie-backs to hold the curtain up while I am trying to find dishes/appliances.


It's an instant mess hider :)

Also, I have published posts talking about building a new bed. I wanted to build the Farmhouse bed, but at a pricetag of $126 before paint, screws, nails, etc., it was a little out of my budget. Another issue that I would have had to deal with is the fact that I would have an extra headboard around the apartment. I didn't want to get rid of it, but I had no room to store it. So... to solve the dillemas of money and storage, I opted to build a different bed. This Modern Bed was much better. It would allow me to use the old headboard and save money (about $70). So, without further ado... pictures.


The old bed. I forgot to show the cement block leg.
The Bed Before...


The bed during...
I know what you're thinking... "What, no after?" Well, me, being the brilliant photographer that I am, forgot to take an after picture. I promise I will take one tonight, after I charge my camera battery.

Friday, July 30, 2010

.... nevermind the selling

Selling tin crosses is out. Why?, you may ask? Because it's dangerous. (and could ultimately lead to me being kicked out of the apartment ;) ) I threw the scraps away in the garbage. Christopher didn't notice the shiny metal sticking out of the bag and then proceeded to push the garbage down to make more room and sliced his finger open. He didn't need stitches, but I didn't want to chance another injury because of a craft project... so crosses are out.

For now, though, I am thinking about making a new bed. The current bed is being held up by a concrete block. I have been eyeing this bed from Knock-off Wood's blog. I already have lumber left over from building the dresser and next week would be the perfect time to build it. Chris is going to a Conference and doesn't like to be around when I am building (because it's loud and I tend to loose my temper... imagine that. ). Also, school will not have started yet and the neighboring apartments are unoccupied. So, while he's gone, I may sneak off to Lowe's, buy the lumber, and build the Farmhouse bed. It looks so pretty. Plus, it will be nice to have a bed that's not part MDF, metal, and concrete block.

Sunday, May 16, 2010

It's Done!!!!


The dresser is finally done and my living room looks like a living room. Time to take a break. ;)

Thursday, May 13, 2010

I'm itching, literally, to finish my dresser

My arm is driving me crazy.... it's itching and stinging (which I assume is a good thing, especially since I had a plug of skin removed from my arm). Plus, I am figuratively itching to finish my dresser. It's sitting in the middle of my living room floor, right in front of the TV. Since it's 36" high, it's also blocking the TV.

There is sawdust on my carpet and on my sofa, lumber in the walkway and on the side-table, and a skilsaw by the front door... and what does Chris do? Invite someone over! My house looks like HGTV threw up in it and he has friends over.

I love friends, but I hate that my house is such a mess. At least I did pick up the plastic bags from the drawer slides last night. I also had electrical tape stuck to the carpet, but removed it.

I think now, I'm more ready to have my house back to normal than to have a new dresser.

I forgot to mention that Chris's office is also a mess since I took apart the video game shelf to construct my dresser. I had used 1x12's and 1x10's on the shelf and had planned to use the old dresser to store videogames, so I decided instead of having to store something else, I would use it in something else. Because of this, I have videogames everywhere! (tons of videogames for 5 different systems, all over the room)

I thought about sawing the lumber around 9 p.m. last night, but figured I would irritate the neighbors. (I should have, because around 11 p.m., my upstairs neighbor decided to play his guitar outside, on his porch, next to my bedroom window).

On the bright side, I picked up a new hobby... painting on glass. I found some paint at Hobby Lobby that looks like stained glass after you paint. I've been wanting to take up making stained glass creations, but it's such an expensive hobby to get into. This was a lot cheaper. All you need is stained glass paint (not sure if that's the real name, but it's what I'm calling it), glass/plexiglass, and an idea.

Monday, May 10, 2010

I hate learning things the hard way... and my shopping list for Lowe's

Yesterday afternoon, I worked on the evil dresser. It has become evil because it has consumed my life. (well, not really, but it is a really good project if you want a project to eat away at your pocketbook).


I had planned to attach the drawer slides to the dresser drawers, install the drawers, and then mount the fronts on the dressers. That's not what happened.


Word of Wisdom: When mounting the dresser slides to the drawers, be sure to mount the wheels toward the back of the drawer, not the front. An hour later and many moments of frustration later, I realized that I had attached the brackets backwards.


Secondly, I did not measure the appropriate distance to attach the first drawer. I ended up with a 1.5 inch gap at the top. (it's supposed to be flush with the top).


Tonight, I will basically restart installing the drawers and maybe get to a point where I can see what the drawers look like in the cabinet and hopefully post some pictures. Right now, it looks like a bunch of ladders stacked on top of each other.


I didn't go to school for art, as you can probably tell. I just didn't want to post another "post" without having a picture explaining what was going on.

This afternoon, I plan to run by Lowe's to get some more supplies for the black-hole of my money. It has eaten all of my screws, all of my nails, and even all of the plywood that I had purchased for it. I didn't want to have to buy drawer handles for it, but it will be next to impossible for me to make my own handles. Here are some ideas of handles for the dresser:

1. I would like this Satin Nickel Drawer Pull, but at $3.97, that would come out to nearly $24.

2. There is no way in Hades that I would buy this drawer handle, but at $.86, it's looking mighty good.

3. This is more in my price range, but I think the scroll work may distract from the art that I am going to try to paint on the front. On the bright side, the handle will match my fine china.

4. This one is closer to what I'm looking for, but it's a little to "mickey mouse-ish" for me.

5. I'm thinking about going with this one because it looks more modern. And, at $1.28, it will not break the bank.

6. I am quickly falling in love with this handle. It's shiny, silver, and only $1.37 per handle.

7. If I had $1,000,000.00, I may purchase these handles. They are my ideal handles-modern, silver, and cool-looking, but, at $15.15 a piece, there's no way.

8. I may go with this one, though, because at $.97 a piece, who can pass up this deal.

Friday, May 7, 2010

The Dresser


I've been working every night this week on my new dresser. (the picture to the left is not it) I have the frame built and 3 sides of the drawers assembled. I'm waiting until I have completed the drawers until I put the 4th side on the drawers. I am now trying to figure out how to paint it. I was thinking just regular pecan stain, to match my other furniture, but now, I have a new inspiration... drawing a bird and branch on it. I don't want to paint it white, though, so I'm thinking about doing a design, using two different colors of stain. That may be hard to accomplish, but I think if I tape off my design, paint the darker color, and then paint the lighter color all over, it would work out.

The dresser to the right is sort of what my dresser will look like (minus the bamboo). The basic structure is the same-six drawers, with the fronts connected and one beam in the middle.

This weekend, I will put the bottom on the drawers and then install the drawer slides. If you hear a string of expletives, it's probably coming from me, especially since not only do you have to put them at equidistant measurements, but they also have to be level. I tried to install one, just to see how hard it would be, and boy, it's going to be a fun.

Friday, April 30, 2010

Latest project

Well, even though I have 2 crocheting projects underway (one of which I started at least 3 years ago), I have decided to build a dresser-mainly because the dresser we have now will fall on you if more than 2 drawers are open at a time and it will not hold all of our clothes. Here is the dresser that is my inspiration. It's Pottery Barn's Ashby Collection. I figured it up, to build it, it will only cost around $120. That's a big difference, plus, it will give me something to do this summer.

Also, thanks to returning a textbook, I have a little money to fund the project.

Did I mention the textbook story? Well, I went to Barnes and Noble to return the book. They informed me that they could only give me a little over $7 for it since they had reached their retail limit. I already had it for sale on amazon.com for $12.34, so I decided to keep it. Later in the day, I got to thinking and decided that it wasn't worth the trouble of holding the book at my apartment when I could get paid now, so I decided to take it to Campus Book Mart on my way home from work. Well.... I'm glad I did. They gave me $60 for it. $60!!!!!!!!!!!! I was so excited.

I went home and finished drawing up my plans while listening to the soap opera. We had the windows open because we had just finished cooking dinner and the apartment was getting hot. A girl was on the phone with her husband and was giving him hell for not graduating (along with other stuff). I'm sure she doesn't want me posting that phone call online for all to read, so I won't. As the conversation went on, I thought for sure that I would see her husband's clothes in the parking lot.

I went to Lowes to price my dresser and to avoid the nerdfest going on in my apartment. My husband and his brother were a) downloading Starcraft (and hogging all of the bandwidth), b) playing Pokemon, and c) creating Magic the Gathering decks to play cards against each other.

The new dresser will be so much larger than the other one. It will be 52" wide, 40" tall, and 22" deep.

I'll have to wait until next weekend to start it, though, because my in-laws are coming up this weekend and my brother-in-law is graduating.

Tuesday, March 23, 2010

Nightstand

I have been living with a TV table as my nightstand for the past 2.5 years. You would think that I would have one, but since I slept on the top bunk in college and had a computer desk right next to my head in my first apartment, I have never really had a need for a nightstand. My eyes were finally opened once I saw this:

I realized that I needed a nightstand, preferably one that matched the one that matched the one that Christopher had. That's one good thing about getting married- you inherit a lot of furniture.


I didn't want to spend the $80 to get a replacement nightstand. I also wanted to clear out some clutter in my apartment as well-by using the MDF from an old entertainment center.


I took the measurements of Christopher's nightstand and began to cut out the appropriate pieces. I then put them together and painted them with some sample paint that I had purchased at Lowes. I thought I had bought the appropriate color, unfortunately, I was a few shades off.


I could really realize it after I put it together and put it by my bed. I didn't like the yellow color.


While at work, I found out that they make a brush that can paint woodstain onto furniture. I had to try it out. I was really impressed with how it turned out. It would have looked more like woodstain if I hadn't used a mixture of polyurethane and stain. If you use just stain, it will look better.

I was really impressed with how it turned out. When I get some extra spending money, I may invest in drawer slides for the drawer. Right now, the drawer is sitting on two boards. The drawer works, but is always at risk of falling out if you open it too far.
I think it looks pretty close to Chris's nightstand.

Wednesday, March 17, 2010

The new planter

Well, I built something, but it wasn't what was proposed earlier in the blog.

I went to Lowe's to buy the lumber and... well.... 12 foot boards won't really fit in the car. Because they do not sell car-stretchers at Lowes, I decided to rethink my planter box and make something simpler. (smaller). Lowe's sells 6 foot boards that fit nicely into the car.

I changed the plan to be something simpler that would only require 8 1x6x6's. I had one 2x4x10 on-hand to build the supports for the planter.

I also was needing boards with straight-cut lines.... I have a tendency to cut not-so-straight lines. I finally talked myself into buying a skil-saw. It worked wonderfully.

The next chapter in the planter saga was the fact that I needed dirt. Do you know how hard it is to find dirt if you want to just dig it up? I had to scratch my head and try to find a place that wouldn't arrest me for digging.

I tried to get dirt from a remote spot near my apartment, but wet clay is heavier than it looks. It took me FOREVER to drag back a bucket of dirt to the apartment... and I didn't even do all of the dragging. I wimped out half-way to the apartment and had to get my husband to drag it back. He ended up pulling a muscle in his arm and gave up after getting the dirt back to the house.

I then decided to look for a better spot for dirt. I settled on getting dirt from the ditches around my apartment. This way, I would be doing a favor by cleaning out the ditches and getting dirt for my box.

After filling my box with old potting soil and clay, I decided that it was time to go to walmart and buy some potting soil to fill up the rest of the box. Did you know Walmart sells dirt for less than $1.50 a bag? That doesn't seem like a bad price, considering all of the sore muscles that I still have after hauling tons of dirt all Sunday evening.

I planted all of my flowers on one side (my daylilies, irises, azalea bush, and cedar tree). The other half of my planter will be leaf lettuce (bought from walmart) and bell pepper seeds (that I had saved from a bell pepper-I just hope they sprout). If the bell peppers don't work, I may either plant the canteloupe seeds that I had saved from a canteloupe last summer or maybe plant a cucumber plant.


I will have to post pictures later.

Thursday, March 11, 2010

Updated plans

I have posted plans to build the planter box. I will warn you that the image is not to scale and I have not built it yet (but I plan to buy the stuff tonight... Yay! roadtrip to Lowe's).

Wednesday, March 10, 2010

Spring is here

Spring has arrived on campus. The daffodils are in bloom and the tulip trees are in full-force. I also noticed that my daylilies are starting to sprout new leaves in preperation of the new summer blooming season.


Chris described my front porch as cluttered, which I thought was a very nice compliment, considering that I thought it looked terrible. He and I both agree that it would be nice to have a new way to plant the plants. Thus, I have designed a planter, based on a design that I found on the internet.

It is approximately 7 feet wide and 20 inches tall. The two bins on the ends will be for storage.

Monday, February 22, 2010

Dear Santa:

Dear Santa:

I would love a circular saw for Christmas. I know I've been asking for one for years, but this year, I'm serious. I really need it to build new furniture from Knock-off Wood. Also, the saw that Lowe's uses is out of commission and I don't want to go to Columbus to cut wood.

Another reason that I want a saw is that I REALLY want to make this desk. If you saw Christopher's desk now, you would understand. He needs storage.... I mean NEEDS storage (and a sense of organization, but that's another blog post.... (j/k Chris) ).

I am on a mission to organize my apartment before I move out in three to four years.

Your help would be appreciated and tell Rudolph that I will give him extra carrots.

Love,

Me.

Thursday, February 18, 2010

Blankets

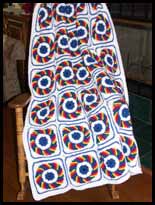
Have you ever been inspired to do something, and it seems like a good idea at the time to start the project, but you just can't bring yourself to finish it? I am going through a phase like that right now with an afghan. I started it when I was in college but put it away. It's still incomplete, over five years later. Here is a small picture of the pattern I found on the internet. My afghan is a different color scheme... it's mainly purples, greens, tans, and creams.

Maybe this afghan never had a good start to begin with. It started to be another type of afghan, but was taken apart after I didn't like it. It was supposed to be a wedding gift for someone. They have now been married for over seven years!

I found this square online. It looks so neat. Also, I found a dog costume that would be awesome to make. Did I mention that awesome seems to be my word for the day?

This baby blanket looks like a good way to use scraps. I have some bright colors that would look great in this pattern.

The problem is that I have lost the drive to crochet. I start to do it and then I get tired with crocheting.
I have, however, finished one project. Remember the china cabinet I talked about for like a month? Here it is before:


And .....


(pause for dramatic effect:)


After!
I have also been talking about a chair. After pricing upholstery fabric, and since I was looking at needing at least two yards of fabric, I decided to buy a drop cloth used for painting. I got all of the material I needed for the price of one yard of upholstery fabric on sale!

Before: After: